Landscaping
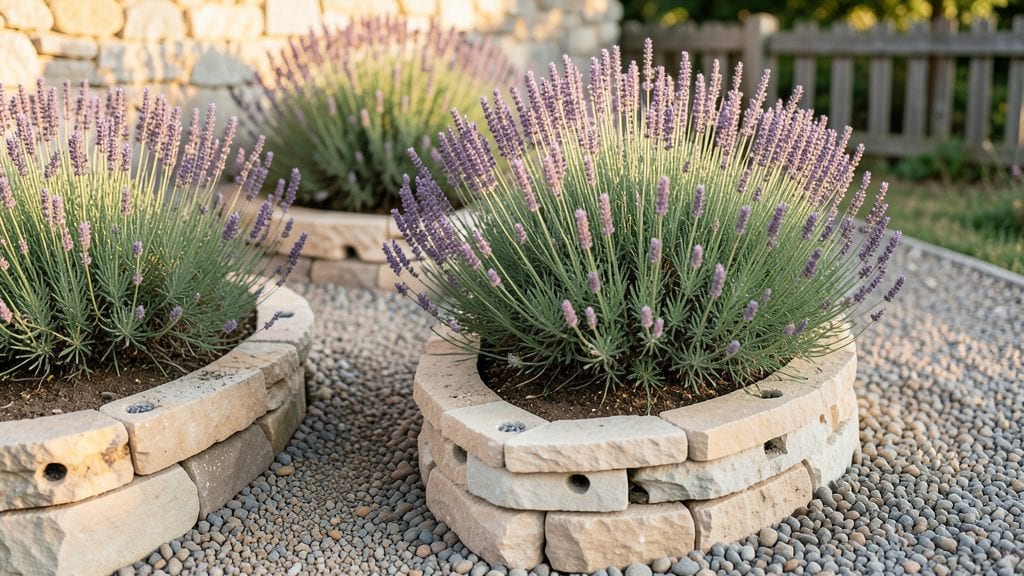
My terraced garden designs turned the backyard’s steep slope into a layered paradise where every tier solves drainage while boosting harvests—here’s how I did it. 🌿 own purpose—whether it’s fragrant herbs, cascading flowers, or a raised veggie patch.
The key is balancing form and function: stone edges hold soil in place, gravel layers prevent erosion, and retention walls (wood or brick) add structure without breaking the bank.
You’ll need a level, measuring tape, and a shovel, but the payoff is a garden that looks like a masterpiece while working harder than flat ground ever could.
Imagine stepping down each level to find thriving plants that stay hydrated, pests stay out, and your back stays happy—no more bending over for weeds or fighting mud. The right plant choices (like drought-resistant lavender on upper tiers or water-loving lettuce below) make each terrace shine while keeping maintenance simple.
Works for small urban yards or sprawling rural plots, and adapts to edible gardens, pollinator havens, or pure ornamentals. Let’s design yours so it’s as practical as it is pretty—no more wasted slopes!
📚 In This Guide
- What you need
- Instructions
- Tips and common mistakes
- Wrapping up and next steps
What you need
- ● Retaining Wall Blocks: Choose from segmental retaining wall (SRW) blocks (e.g., concrete, stone, or composite) or natural stone (e.g., flagstone, bluestone, or sandstone). Quantity depends on design, but budget for 10–20 blocks per square foot of wall height (e.g., 200–400 blocks for a 10’ x 3’ tier).
- ● Gravel: Crushed stone (¾”–1½” diameter) for drainage and base layer. Aim for 2–3 cubic feet per square foot of garden area (e.g., 40–60 cubic feet for a 10’ x 3’ tier).
- ● Soil: High-quality topsoil or garden mix with compost (avoid clay-heavy soil). Plan for 1–2 cubic yards per tier.
- ● Landscape Fabric: Non-woven geotextile (3’–5’ width) to prevent weed growth. Cut to fit between gravel and soil layers.
- ○ Edging Materials (Optional): Metal or plastic edging strips (for clean lines).
- ● Natural stone or brick (for rustic charm).
- ● Mulch: Wood chips, bark, or rubber mulch (2–3” deep) to retain moisture and suppress weeds.
- ● Plants: Choose drought-tolerant, erosion-resistant species like sedum, ferns, or ornamental grasses. Quantity varies by design—plan for 3–5 plants per square foot.
- ● Measuring Tape & String Line – For precise leveling and layout.
- ● Wheelbarrow – To haul gravel, soil, and plants.
- ● Shovel & Spade – For digging and soil prep.
- ● Level & Transit Level – Critical for ensuring each tier is perfectly even.
- ● Rubber Mallet – For tapping retaining wall blocks into place.
- ● Plate Compactor or Tamper – To compact gravel and soil layers.
- ● Safety Gear: Gloves, knee pads, and ear protection (if using a compactor).
- ○ Optional Extras: Laser level for large projects.
- ● Hose with spray nozzle for dust control.
- ● Post-hole digger if adding support stakes.
- ● Site Assessment: Check for slope stability, drainage patterns, and underground utilities (call 811 if unsure).
- ● Permits: Verify local regulations—some areas require permits for retaining walls over 4’ tall.
- ● Weather Window: Plan for dry, mild days to avoid working with muddy soil or unstable blocks.
- ● Drainage Plan: If your area has heavy rainfall, consider adding French drains or swales behind lower tiers.
How to design terraced gardens for optimal drainage and aesthetic flow
Elevated layers transform slopes into usable, stunning garden spaces—here’s how to plan them right.
🪴 Step 1: Analyze Your Slope and Determine Terraced Layout
Start by mapping your slope’s angle and length. Use a 4-foot level to mark horizontal lines where each terrace will sit—typically 2-3 feet apart vertically for stability and drainage. I sketch my design on graph paper first, scaling 1 inch = 1 foot, to visualize how plants and pathways will flow between tiers.
For gentle slopes (<15°), wider terraces (4-6 feet deep) work best. Steeper slopes (>30°) need narrower, deeper tiers (3 feet wide x 2 feet high) with retaining walls. Measure the total horizontal distance between terraces—this dictates how much soil and materials you’ll need for each level.
💧 Step 2: Build Retaining Structures for Stability and Drainage
Choose materials based on your slope and budget: stacked stone (heavy, natural look), timber frames (temporary, budget-friendly), or concrete blocks (permanent, structured). For 4 terraces, you’ll need ~120 cubic feet of fill soil (accounting for compaction) and ~500 pounds of retaining material (e.g., 200–300 river rocks or 100+ concrete blocks).
Dig the first terrace 1 foot deep along your marked line, then layer materials in 6-inch lifts, tamping each layer firmly. Leave a 4-inch gap at the back for drainage—fill it with gravel or crushed stone to prevent water pooling. The top edge of each terrace should slope slightly outward (2-3°) to shed rainwater efficiently.
☀️ Step 3: Layer Soil and Install Drainage Systems
Backfill each terrace with topsoil mixed with 20% compost (e.g., 2 cubic feet per square foot of terrace). For 4 terraces, that’s ~8 cubic yards total. Install perforated drainage pipe at the base of each retaining wall, sloping 1/4 inch per foot toward a central outlet. Cover pipes with landscape fabric to block soil while allowing water flow.
Top each terrace with a 2-inch layer of mulch (e.g., wood chips or straw) to retain moisture and suppress weeds. Avoid organic mulch near retaining walls—it decomposes and can destabilize structures over time. Test drainage by watering each terrace; puddling after 30 minutes means you need more gravel or a steeper slope.
🌱 Step 4: Plant for Visual Flow and Erosion Control
Designate front tiers (lowest) for moisture-loving plants (e.g., ferns, hostas) and upper tiers for drought-tolerant species (e.g., lavender, sedum). Use 3-foot spacing between mature plants to allow airflow and maintenance access. For 4 terraces, plan ~20-30 plants total, staggering heights and textures for dynamic visual flow.
Plant ground covers (e.g., creeping thyme, ajuga) along terrace edges to prevent erosion. Anchor vines (e.g., clematis, climbing roses) to trellises at the back of each tier to soften vertical lines. Water deeply 2-3 times weekly for the first month, then taper to once weekly once established—terraces dry out faster than flat gardens.
✂️ Step 5: Maintain Terraces for Long-Term Health
Inspect retaining walls seasonally for cracks or shifting—repair with fresh mortar or additional stones immediately. Top off mulch annually (add 1-2 inches) to preserve moisture. Fertilize spring and fall with a slow-release, balanced formula (10-10-10), applying 1 pound per 100 square feet of terrace area.
Prune perennials early spring before new growth appears, and deadhead annuals weekly to encourage continuous blooms. If a terrace sags over time, reinforce the backfill with additional gravel or extend the retaining wall. With proper care, terraces last decades while reducing erosion and expanding your garden’s usable space.
Tips & tricks for perfect terraced garden designs
Transforming slopes into functional, beautiful terraces takes precision—and these pro tips will help you avoid common pitfalls while maximizing both drainage and visual impact.
Slope Analysis is Everything: Before marking your first line, spend time observing how water flows naturally down your slope during rain. I always test with a garden hose—where water pools or rushes indicates where you'll need steeper terraces or additional drainage. The 2-3 foot vertical spacing between tiers mentioned in Step 1 works for most landscapes, but adjust downward if your slope exceeds 30° to prevent soil erosion during heavy rains.
Material Selection Matters More Than You Think: Don't skimp on retaining wall materials—timber frames may save money upfront but typically last only 5-7 years before rotting. For long-term stability, opt for stacked stone or concrete blocks, especially on upper terraces where water pressure is greatest. Pro tip: Layer your 6-inch lifts with a 1-inch bed of coarse sand between each layer to improve drainage and prevent shifting over time.
Drainage Testing Can't Be Overstated: That 30-minute puddle test after watering is your best friend. If water pools after this time, you have two options: either increase the slope of your terrace edges (aim for 5-7° outward slope) or add an additional 2-3 inches of gravel behind your retaining wall. I've seen terraces fail spectacularly when homeowners skip this step—don't make that mistake!
Plant Placement for Long-Term Success: When arranging your 20-30 plants across 4 terraces, place the tallest specimens at the back of each tier to create natural vertical layers. I recommend using 3-foot spacing between mature plants, but reduce this to 2 feet for ground covers like creeping thyme—they'll spread aggressively and help stabilize soil. For erosion control, interplant deep-rooted perennials (like Russian sage) every 5 feet along terrace edges.
Pro Tips for Terraced Garden Designs
- Transforming slopes into functional, beautiful terraces takes precision—and these pro tips will help you avoid common...
- Slope Analysis is Everything: Before marking your first line, spend time observing how water flows naturally down you...
- Material Selection Matters More Than You Think: Don't skimp on retaining wall materials—timber frames may save money ...
Frequently asked questions
Got questions about terraced garden designs?
You’re not alone—planning and building terraces can feel overwhelming! Here are some of the most common questions (and answers) to help you navigate the process with confidence.
What’s the best time of year to build terraced gardens?
The ideal time is early spring or fall when the ground is workable but not frozen or waterlogged. Avoid summer heatwaves or winter frost, which can complicate excavation and plant survival. If you’re in a mild climate, spring is perfect for planting too!
How do I prevent soil erosion on my terraces?
Use a combination of retention walls, gravel, or mulch to stabilize slopes. For extra protection, plant deep-rooted ground covers like creeping thyme or ornamental grasses. Ensure proper drainage with French drains or perforated pipes if your area gets heavy rain.
Can I build terraces without a retaining wall?
Yes! For gentle slopes, stepped stone paths or wooden edging can create visual terraces without heavy construction. However, for steep inclines or heavy soil, retaining walls (stone, brick, or concrete) are essential to prevent collapse. Always check local building codes first!
What plants thrive in terraced garden conditions?
Opt for drought-tolerant, erosion-resistant plants like lavender, sedum, or Russian sage. For edible gardens, try strawberries, herbs, or shallow-rooted veggies in raised beds. Avoid heavy feeders like tomatoes unless your soil is rich and well-drained.
How do I fix uneven terraces after construction?
Start by leveling the surface with a rake or shovel, then add a thin layer of topsoil or compost. For deeper issues, adjust the retaining wall or add support structures. If drainage is poor, consider redirecting water with swales or downspout extensions.
Are terraced gardens expensive to maintain?
Not necessarily! Low-maintenance options like gravel, native plants, and permeable paving reduce costs. Focus on mulching, occasional weeding, and checking walls for cracks. Investing in quality materials upfront (like durable stone or composite wood) can save long-term headaches.
Wrapping up and next steps
Terraced gardens aren’t just about solving drainage—they’re a canvas for creativity, blending function with stunning visuals. Whether you’re working with a steep slope or simply love the layered aesthetic, these designs transform tricky spaces into lush, usable areas.
Start small, plan with purpose, and let your garden tell its own story!
Ready to bring your vision to life? Sketch a rough layout, gather your materials, and take the first step today—your future garden (and your back!) will thank you. 🌿✨